 Narrowsburg
Light Rain Fog/Mist, 43°
Wind: 8.1 mph
 Narrowsburg
We’ve all been there. Finally get the shot, the animal is down, and it’s time to get to the real work. You make the cut and sigh because your knife just isn’t as sharp as you …
Stay informed about your community and support local independent journalism.
Subscribe to The River Reporter today. click here
This item is available in full to subscribers.
Please log in to continue |
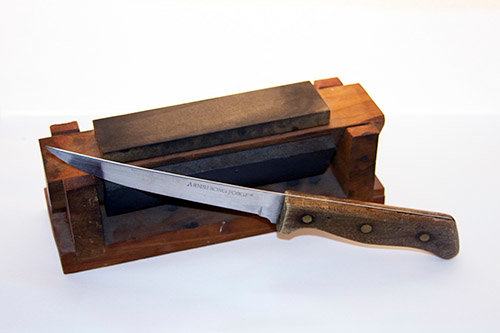
TRR photo by Amanda Reed
A tri-hone whetstone and some patience can bring dull knives back to their former glory.
We’ve all been there. Finally get the shot, the animal is down, and it’s time to get to the real work. You make the cut and sigh because your knife just isn’t as sharp as you remembered. The sharpness of your blade can make butchering the animal quick and easy, or a long-drawn-out process that makes you forget why you hunt in the first place.
With a strong resolve, you vow to get that knife sharp as soon as you get back home. But are you really sharpening it right?
From steel to stone, there are numerous ways to sharpen a knife, but not all methods are equal. An electric knife sharpener will get it done faster, but normally does not do as well as a slow and steady hand sharpening.
Sharpening steel
You’ve probably seen these in knife sets or butchering kits. They almost resemble a rapier: round, thin and with a handle. These are great for everyday maintenance; however, a dull blade won’t gain much edge from using it. This is because it technically isn’t a sharpener. This tool just helps to straighten the edge of the knife blade and allows for smoother and safer cuts.
To use the sharpening steel is simple. You hold it in one hand and hold the knife in the other. With a little pressure applied you make a sweeping motion from the base to the tip. And then do the same thing with the other side of the blade.
This is something that can be done easily each time you use your knife, or at least weekly. This will help lengthen the time between each of your actual sharpenings.
Sharpening stone
This is a tried-and-true method for getting the perfect edge. The sharpening stone is durable, reliable and produces an amazingly sharp edge if you use it correctly. While the steel was for everyday maintenance, the stone is for when your knife is dulled and needs a good edge to bring it back to life.
There are different types of sharpening stones: oil, diamond and whetstone. The oil stone needs to be greased with oil before use. The diamond stone, though pricey, can be used dry and is extremely durable. The whetstone needs to be soaked in water before use to be sure to not scratch the knife surface. Some, though, skip the water soak and use an oil, or even their own spit on the blade. (Be sure to check with your stone maker to see what’s recommended. Not using it right could do more damage than good.)
Whetstones commonly come with a rough side and a smooth side. There are also tri-hone whetstones which offer three levels of coarseness to get the perfect edge. Fun fact about a whetstone: it’s not called that because it needs to be wet. But rather because the word “whet” is the old English word for sharpen.
No matter which one you use, the principle is the same. Start coarse and work up to smooth. The coarser the stone, the more metal it removes. A fine stone sharpens and polishes the edge. The finer the stone, the more likely you’ll end up with a razor sharp edge.
Start by putting the solution on the stone, and then get the angle right. Ideally, you want to keep the same grind and edge angle that the blade had when it was new. Most blades have an angle of 15 to 20 degrees. If you have a hard time figuring it out, a good rule of thumb is to hold the blade so the back of it is about one blade width up from flat on the stone. Start with the base of the knife and gently apply pressure as you sweep toward the tip. It will feel slightly like grinding on sandpaper. Then flip your knife over and do the same to the other side. Alternate sides until the edge starts to feel sharper. Then move to the finer side of your stone and repeat the process.
Handheld and electric sharpeners
There are plenty of “easy-to-use” gimmicks and plastic sharpeners that fit in the palm of your hand. And while these may work, they often take more out of the blade than you want to have gone. The angle for sharpening is standardized on these, so your knife may have a different sharpening angle when you’re done compared to when it was new. For cheap dollar-store knives, using these is fine. It will get the blade sharper and do it faster than the others. Often though, the sharp edge fades a lot more quickly than using other methods.
No matter which handheld or electric sharpener you use, the method is the same. Start at the hilt and move toward the tip. Don’t apply excess pressure, and you’ll be fine.
Ceramic plate
If your knife needs a quick touch up and you don’t have a sharpener, a ceramic plate or mug can be used in a pinch. Call it a redneck lifehack if you will, but this will work in a pinch. The rough area on the bottom of a mug, or the back of a plate is a great surface for sharpening your knife. Unless you’re pressing way too hard, or have the plate on a slick surface, you don’t need to worry about breaking it. Just use the same motion you would with a stone and enjoy your newly crisp blade.
Some general tips and tricks
• When working with your knife, don’t let the blade skip along the surface. Doing so will add nicks and grooves in the blade and make it much harder to cut with. It can also create a rounded tip or add scratches to the blade.
• If you do have a nick in your edge, work it separately until the nick is down. It’s best to work the entire area around it until the nick is gone, and then rework the whole length of your knife. However, if the nick is in a place that doesn’t interfere with cutting, it might be best to leave it alone.
• Circular sharpening is a trick that helps hold the blade at the proper angle. Keep the blade on the surface and use an easy, clockwise motion with the edge facing right, until the desired sharpness is achieved. If you’re left-handed, flip the blade and the rotation counterclockwise.
• When storing your knives, don’t store them together in a drawer. Bare blades will not only cut you, but they also cut each other. This makes them dull where they touch each other.
• A sharp knife is a safe knife. Dull blades mean you’ll be applying excess pressure. When the knife finally moves, that excess force is hazardous.
• Don’t put that knife in the dishwasher. Dishwashing detergent is hard on your knife and may dull the blade over time. Instead, gently scrub your knife with dish soap and hot water. Dry the knife completely with a dish towel, then store it.
• A good knife deserves a cutting board. Sure, you can get away with cutting on a marble countertop or a glass surface without messing up the counter, but your knife isn’t as forgiving. Hard surfaces dull knives pretty quickly.
Test that blade
The best way to test your blade isn’t by trying to shave your arm, but rather by slicing a tomato. If the knife goes easily through the skin of the tomato, you’ve got a great edge. If it doesn’t, try a little more fine honing to get that razor sharp edge. If that doesn’t work, its back to the whetstone.
If you don’t have a tomato lying around, a standard piece of paper will do. Starting at the top of the paper, try to slice your knife through the entire piece of paper. If it cuts easily, then your knife is sharp. If not, try some more sharpening.
Now that you know how, get to sharpening those knives for the kitchen and in the field.


Comments
No comments on this item Please log in to comment by clicking here